Saturday, August 27, 2011

New (Old) Coffee Table!

Last weekend my mom and I found this awesome coffee table at a yard sale.  Luckily she was with me, so I got it for $5 and not the $7 they were asking.  I'm too chicken to try and bargain with people.
Anyway- The table is pretty dinged up, but since I figure any kids I had will just destroy it anyway, I decided to just use the dings to enhance my shabby chic vibe.
Here is the before.
It isn't a very good picture.  I always forget to take the before pictures.  
So, I spent $6 on two cans of aqua spray paint, $3 on clear top coat, $5 for the knob (which was a splurge, but I love it.) and $10 for chalkboard paint for the top.  I don't really count the clear coat and chalkboard paint into the total cost because there is so much left over that I can do a lot more crafting with those.
So, one week and $20 later, I have a new coffee table!
It was my first ever attempt at antiquing anything with paint, so its not the best job, but I learned a lot and I love my new table!

Tuesday, July 26, 2011

Off My Chest

I am writing this blog post because I need to get something off of my chest and seeing how this is my blog, I can say whatever I want and if people don't like it, they can just not read it.

I just read an article on cnn.com about how McDonald's is revamping their Happy Meals because they're partially to blame for childhood obesity.  THIS IS RIDICULOUS.  Happy Meals are not to blame for childhood obesity.  Parents not being responsible (for the most part) is.  Just because your kid wants to go to McD's doesn't mean you have to take them.  Just because you are in a hurry after work doesn't mean you have to go for fast food.  Boil some noodles and make a quick marinara from diced tomatoes.  It isn't that hard and it doesn't take more than 15 minutes.  And honestly, from my experience, kids don't even finish their meals at McD's.  Half the time is spent trying to get them out of the play place to eat.  KIDS WANT TO PLAY.  Make them a quick dinner and then go to a park so they can get some outdoor time.  Quit blaming other people because your kids are fat.

I also wish people would quit telling me what foods are "healthy and unhealthy".  The food I eat is not what made me fat.  I really didn't change my eating habits that much when I gained 50 pounds.  Sitting at a desk all day and never exercising made me fat.  I am the only person or thing to blame for being fat.

Wednesday, June 15, 2011

1 Down, Forever to Go.

One year ago today I married the love of my life.  It has been a crazy adventure and one I don't regret for a second!

Happy Anniversary Nicholas!  I love you!

Tuesday, June 14, 2011

Real Grass Decor

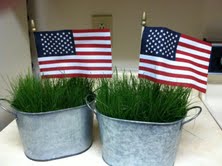
I have to give most of the credit for this project to Nic since he was the only one with the patience to carry it out to the end.  I started growing some grass seed in a couple bins/pots that I bought at Smith's Marketplace at 50% off.  I used the vigoro sun-shade lawn mix (only because this was the smallest bag I could find).
I gave up after 10 days of no growth, but Nic patiently nurtured my little grass pots until they looked like this.
I had some mini pinwheels that I'd purchased at Dollar Tree, but they're in storage, so I got a couple flags from the dollar section at Target.  These little guys are going to live at my moms, so I'm not sure what she'll decide to do with them.
So, if you have a place in your house with sunshine and you're a patient person (or have a patient spouse) this is an awesome and inexpensive decor idea for this summer and all year round!

Friday, March 4, 2011

Chocolate Peanut Butter Pretzel Cupcakes

I made these awesome cupcakes for a coworker's bday!  I got the recipe here.  Anyway...I sucked at the pretzel bottom part, but I did learn that my oven is INCREDIBLY hot in the back and burns everything.
Camera phone pictures are really lame, but you get the jist.
I made a huge mess with the batter, and for the record, you really do have to put some batter under the peanut butter cups or you'll have a huge messy cupcake.
I ended up baking mine for 22 minutes!  I think they're a bit much, but everyone else seems to like them!

Tuesday, March 1, 2011

Magnetic Pin Holder

Project pincushion!  Because who doesn't need one?  I wanted a magnetic pin holder like my mom, but my mom told me we could make one that was a lot cuter than anything we could buy.  First order of business?  Get a dish with a thin bottom.  I got a plain white plate from the D.I.  I wanted it to be extra cute, so I used the cricut to make some vinyl dots.

Once I had my polka dots placed, I sprayed the plate with jade spray paint.  Don't try to pull off the vinyl until the paint has had some time to set, it doesn't work well!

To make it magnetic, I glued magnets on the back with some E6000.  This is why it's important you find a dish with a fairly thing bottom, so the magnets will work through it.


You can see where the magnets pulled together- through the glue and spray paint!  Since they love each other so much, I had to space them pretty far apart.  Turned out that five magnets wasn't enough coverage, so I had to add a few more.  The additional magnets required clamps to keep them from migrating to their magnet loves.

I checked the magnetism by throwing some pins on top and decided it was sufficient, so then I cut a piece of felt the size of the indent on the bottom of the dish and hot glued it on so it would slide nicely on countertops, etc.

VOILA!!!

Single Panel Door Headboard

I've been wanting a headboard for quite some time, and when my mom sent me a link to a tutorial on how to build a headboard from a 5 panel door, I knew I had to try! I couldn't find a 5 panel door (besides a special order one from The Home Depot that would have cost $75!!) So I went to restore and found a door with one big panel, got one 10 foot 4x4 from Home Depot, some 1x2, a 10 foot 1x6, a little moulding, a sheet of bead board, primer and black spraypaint.  Whew.
The first order of business was to cut off some of the door so that the panel was centered.
Then I cut the 4x4 in half and measured out where we needed to make the slots for the door to sit in.
I didn't have a stacked blade or a dato to do this with the table saw, so I used a table saw to cut the outside borders of the slots and then used a router to take out the wood in the middle. 
Once both slots were cut, I put some liquid nails in the slots and slid the door in.  To make sure it was sturdy I put three screws through the post and into the door.
I then took my 1x4 and put it at the top and bottom of the door to bring it level with the front of the posts.  
I then used the 1x6 to make the top of the headboard (Nic wanted somewhere to set things.  Whatever.)
Then I put the molding right underneath the top.
Now I have a fully functioning and awesome headboard!  But, I thought it was plain this way so I cute a piece of bead board to fit in the panel and stuck it on using liquid nails. (I took pictures of this step, but I can't find them.)  I filled in the nail holes with some nail hole filler, then we primed it and sprayed it black.


This is the finished product.  I know it's hard to see, but I can't find the picture I took of it before the bed was made.  The headboard is currently living at my parents house-long story-but someday it will live with me!
Sorry for the pictures.  All my lighting was awful and I don't know how to use my camera.  I'll try to find a better one to post!

Wednesday, February 23, 2011

"Peeding" the Duckies

Last weekend we had some awesome weather and my mom had some stale bread.  Of course we had no choice but to go feed the ducks in the river bottom.  I took my nephew and he told everyone that passed us that we were "peeding the duckies in the river."

What a stud!  

Crafts from a 4 day weekend!

Ok, truth be told, I didn't do much crafting.  But here are a couple projects that I finished over the long weekend.


Zeda's dog treat jar started as this $5 jar from Ikea.

And then I taped out a good size rectangle and painted the inside with chalkboard spray paint.
And then I cut a vinyl frame on the cricut to go around the chalkboard.
Looks pretty good, right?

The second craft I finished was a 9x13 pan my mom found on clearance at Walmart.

I think the fancy edges are awesome, so I didn't want anyone to steal it.


So, we used some glass etching cream and put my name in it!  I know, not a difficult craft, but I think it looks pretty cute!

Sunday, February 20, 2011

I love clearance!

Yesterday I followed my mom to Hancock Fabric.  I'm glad I did because I found this in the clearance section.
Sorry for the blurriness, it's a cell phone picture.  But, this awesome tree was regularly $39.99 and I got it for $3.99!  I'm excited to have more decoration next Christmas! 
Anyway, while I was there I got some supplies to fix the St. Patty's Day wreath I'm working on.  I will probably post that up tomorrow so you can see the improvement!

Wednesday, February 9, 2011

St. Patrick's Day Wreath

I wanted to get a head start on my St. Patrick's Day decorations since I failed at getting anything done for Valentines, so I dropped by the dollar store.  They don't have much out yet, but I got two scarves, 12 shamrocks, and 1 ugly wooden wreath.  Here's how it turned out.  I don't love it-I'm not even sure I like it- but it is a start.

Friday, February 4, 2011

Hair Hair Hair

Let it be known that my husband has too much hair.  Let it also be known that I really hate paying to have his hair cut when he doesn't really care what it looks like.  
So, I try to cut it for him.  This is an itchy, annoying and frustrating project.  After the 5,972nd failure, I've decided to suck it up and pay someone next time.
Poor shorn sheep.

Sunday, January 30, 2011

Let's start at the very beginning.

Its a very good place to start.
I am young.  I am just starting real life.
You can follow me if you dare. (Or you're that bored.)
I hope you enjoy my Crazy Talk.